Friday, December 16, 2011
how to grow from bean seeds
I learned that I need to allow the beans to age in the pods for about a week, then dehydrate them by leaving the seeds in the open for a couple of days before soaking them and then planting them in the soil. This will allow more success rate in their germination. If I plant the beans straight from the pod, most of the beans tend to rot away in the moist and wet medium.
Grow from Cuttings
Method :
Select a healthy stem with a growing tip.
Make a slant cut about 1 cm. below a leaf node.
Strip all the leaves away from the stem and leave about 2 to 3 leaves at the growing tip.
Immerse the stem in water and watch the roots grow in about a week's time.
Change the water every two days to prevent mosquito breeding.
Friday, March 18, 2011
CNY acquisitions!
Didn't get to post this earlier, but I got a bunch of orchids for CNY 2011. It's my first try at orchids really, so I'll just have to see whether they flourish or die under my care :-)

GB may recognize his chairs! The orchids are doing fine so far. This photo was taken two weeks after I bought them, but by now it's been a month and a half, and they are still blooming. Quite surprising, cause I thought they would hate this part of the house (which is west-facing).
Not sure about the type of orchids, but they are pretty common here in Singapore:


Monday, March 14, 2011
Pulled my back!
Gardening has pretty much come to a stand still. Pulled my back while doing Garden Makeover Part 3.1, and pretty much had to take it easy. Garden is still in a mess, with unfilled holes... Sigh... Back was recovering for a while until I pulled it again doing WT, so am now very cautious. Will only go back to real physical stuff next week, I think...
Thursday, March 10, 2011
Thalia geniculata - Update
This is what my ZigZag Plant looks like now! Well, at least before I dug up my garden...

It's actually too tall to capture the whole plant in one photo, so here are some close ups:


Love it!

It's actually too tall to capture the whole plant in one photo, so here are some close ups:


Love it!
Thursday, March 3, 2011
Garden Makeover - Part 3.1
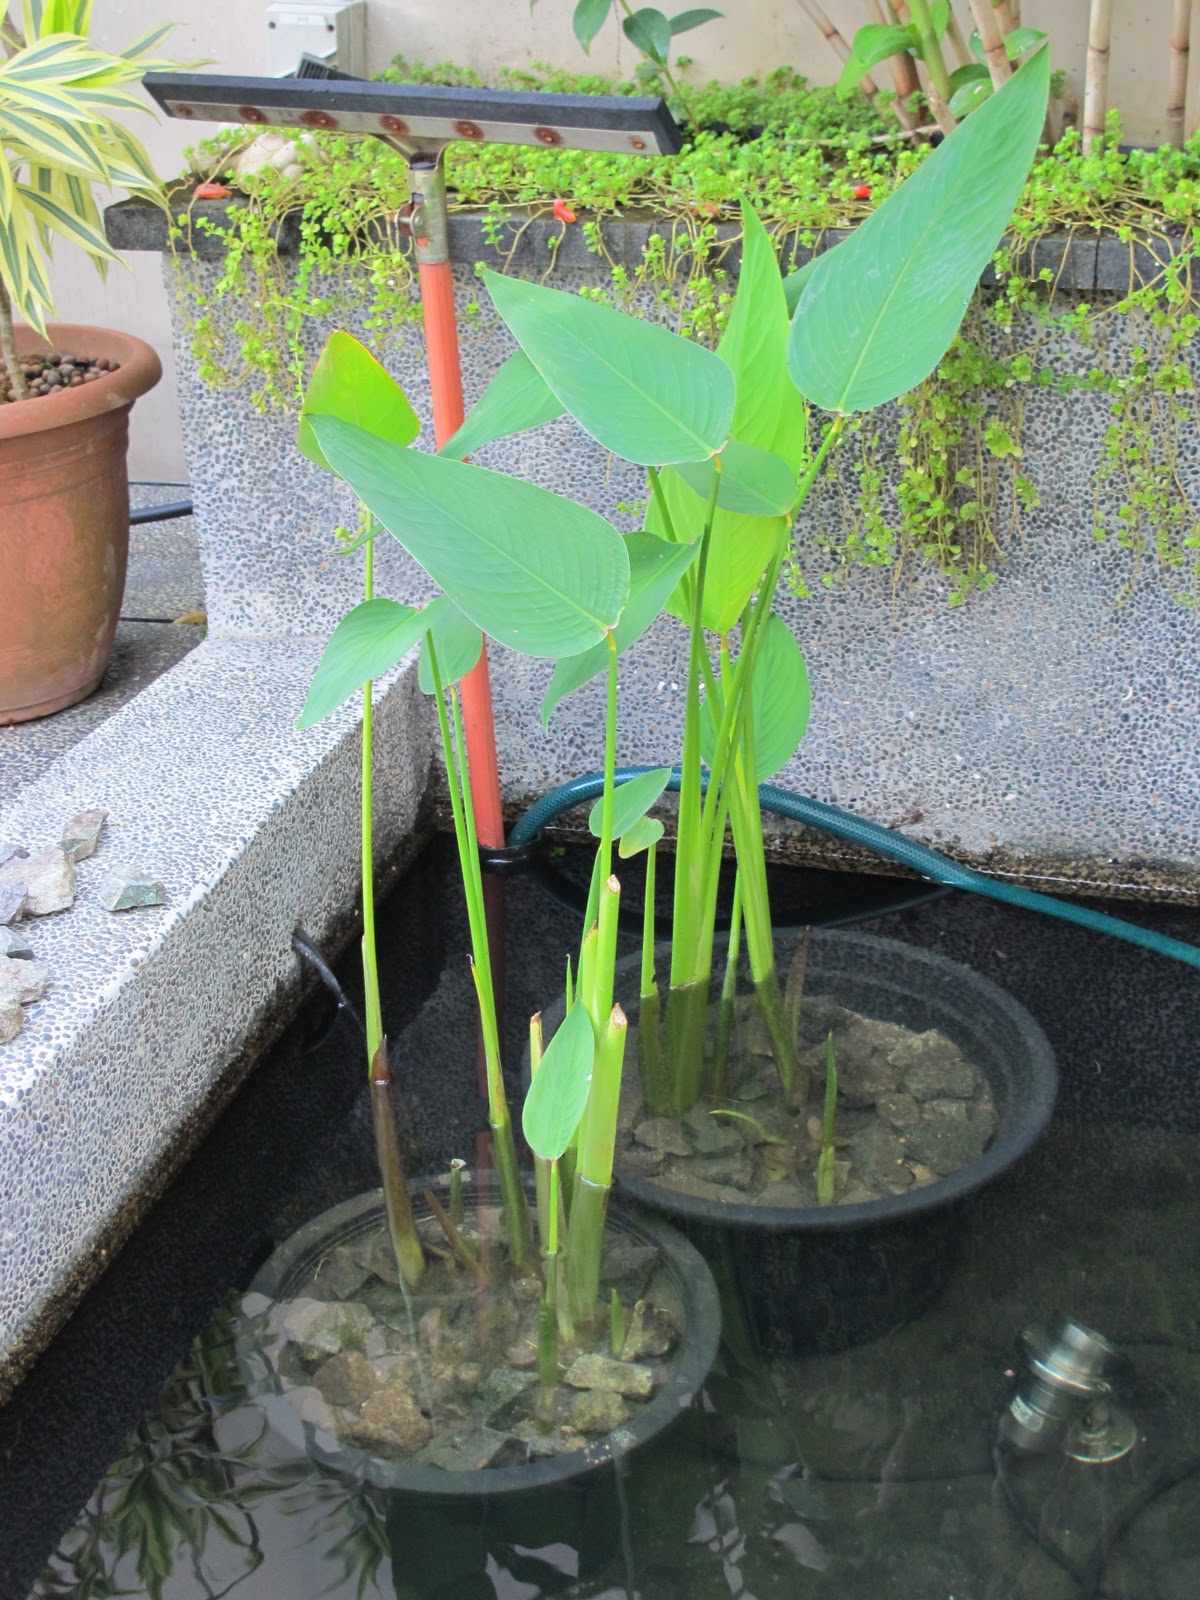
After digging up this corner, I let it "rest" for almost a week. The intention is to determine whether the water logging is really bad (which means the entire garden will have to be dug up) or whether there is a natural water table that my garden is sitting on. During the resting week, there was a huge bout of rain which filled up the hole and then some... it drained back within 24 hours to the level which you saw in my GM Part 3 post. Oh Kay! The diagnosis is that it is a natural water table. I now had a choice of broadening the hole, and create a natural pond, or planting plants that love water.
Since I had a large pond put in at the side of the house when we were building, I thought that another pond would be overkill. (However, it was still very tempting. How many people in Singapore can have a natural pond in their gardens...)
So this is what I did:

I took out a pot of Umbrella Plant (Cyperus Alternifolius) from my pond (it was due to be divided anyway) and stuck it into the ground, and surrounded it with a bunch of Piper Sarmentosum. Let's see if the water-loving plants will (1)survive and (2)help wick away water (3)grow large and gorgeously luscious... Wait for updates in a couple of months...
Monday, February 28, 2011
Garden Makeover - Part 3
Ahhh... My most disastrous corner...

This corner didn't kill any plants... it was my "utility" corner with my auto gate box, water tap, hose etc. But it was the lowest corner of my (sloping) garden, and after digging up my 1st corner (in Garden Makeover - Part 2) I had to check how bad things were here. After all, the grass was almost perpetually wet here. It would squish underfoot everytime I turn on the tap.
I discovered more concrete, more cement wash, a whole layer of anaerobic mud (which smelled really bad), the concrete base that holds up my walls, pvc piping that carried my phone line, scv cable etc, a metal "box" that houses more utility cabling, and a lot of water.

A lot, a lot of water.

Friday, February 25, 2011
Nelumbo nucifera - update
My lotus, which was weak and sharply pruned back in early January, has now recovered and even flowered.

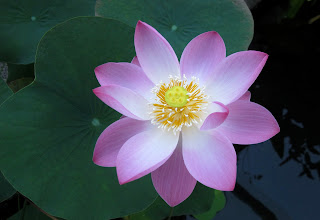


Isn't the flower beautiful? In all it's simplicity...
Tuesday, February 22, 2011
Garden Makeover - Part 2.1 - Cyathea Latebrosa and Caladium Lindenii
I'm trying out a Cyathea Latebrosa, which Gn from my favourite nursery assures me can take full sun. As my garden is fully west facing, I'm a bit apprehensive about this. However, I have lusted after fern trees for many, many years, and as my previous rooftop garden is definitely not conducive for this plant, I gave in to the temptation.

Underneath the Cyathea, I've put in some Caladium Lindenii, which looks pretty good with it's colour offset.
I'll wait for the plants to settle in, and then maybe add different ferns at the base. We'll see.
I'll wait for the plants to settle in, and then maybe add different ferns at the base. We'll see.
Saturday, February 19, 2011
Garden Makeover - Part 2
This corner had out right killed a Red Powderpuff (Callliandra Haematocephala), one of my hubby's favourite plants, and shrivelled a Mulberry bush.
The Red Powderpuff had thrived very well for months after it was planted, and one fine day just shrivelled up and died. The Mulberry used to be in a pot, happily producing fruits, looking as handsome a Mulberry bush can be. I decided to free it from it's pot constraints, and it struggled in the corner. Suffered from almost every problem a Mulberry can: scale, fungal rot, aphids... even the leaves looked like it was contracting something similar to Verticillium Wilt.
So, this is what I did:

I dug it all out.
And I found concrete slab, cement wash, red bricks... All of that came out. I conveniently had an afternoon of rain after the digging and clearing, which had the hole looking like a pond, but it drained and cleared fairly easily.
So, my solution for this corner is a layer of expanded clay (which sits on top of the concrete base that supports the wall, followed by 1:2 pumice and volcanic soil mixture, followed by 1:3 volcanic sand and volcanic soil mixture.
Thursday, February 17, 2011
Garden Makeover - Part 1
The rain in December and January wreaked havoc on my garden plants. The water drainage suspicions that I had for almost a year since I shifted in, became a stark reality.
So, I am now forced to dig up my garden to confirm my suspicions:

Now, I have most of my plants taken out, with dug up holes and "canals" all over...


My Dalbergia Latifolia standing in stark loneliness:


I feel bad giving this tree the chop, so it's a free gift to anyone who wants it. Just bring your changkul and help me dig it up!
Tuesday, February 8, 2011
Belated Gong Xi Fa Cai!
A belated Hoppy Chinese New Ear to everyone!
It's been more than a month since I last blogged, but I had a couple of overseas friends staying with us, and the CNY preparations, celebrations and inebrations...
Just joking ;-)... Time just flies.
Now life is a little bit back to normal, so I'm looking forward to posting on updates for previous posts, and on new acquisitions I made over this period. Also, I'm looking forward to re-modelling my small front lawn, so that should be exciting!
Friday, January 7, 2011
My Old Rooftop - More Photos
Hah! Trying to get my photos organized have unearthed a few more photos of my old rooftop garden. Notice how over-exposed the photos were. This was how strong and bright the sunlight was, even in the morning. I estimate that this was taken around the 9-10am mark. No later than 10.30am.


My old Coral Tree (Erythrinia Fusca), grown in a pot, putting out new growth and flowers after a prune.

My huge Cycad (Cycas Revoluta) that was overshadowing the pond.

The sitting area, seen through another palm (Pinanga Coronata). Yes, many good memories here.

My old staghorn (which was HUGE) and my wild and fern-filled tree fern stem, amidst a large draecana.
This photo does not do the plants justice, and I have no idea why I took it the way I did, but surely there must be a better photo of them somewhere... Ah... to have all my photos unearthed from nooks and crannies, and organized!!! I miss the tree fern stem. Someone gave it to me in early 2000, and my hubby thought I was nuts taking this dead, dirty stem ("rotting" he said) AND hanging it on our roof. I had wanted to tie some ferns on it to make the tree fern stem a literal fern tree, but life has a habit of occupying our time... 6 months later, mother nature had decided to colonize it. Lo and behold! A living fern tree! I counted at least 5-6 different types of ferns, but from this angle you can only see one. Two, if you do an extreme magnification of the photo. Since we were staying very close to the Bukit Timah Nature Reserve, mother nature had probably sent me some spores from there :-)

My palms (Veitchia Merrillii) on the roof, enjoying the sun. Also notice my favourite ponytail plant (Beaucarnea recurvata) [bottom right, second plant].
I bought my ponytail plant as a really tiny plant from Ikea (you know, the type they sell in almost thumb-sized pots? Ok, I exaggerate). That was probably around 1998, give or take a year. This roof photo was taken in 2004, which makes it roughly 6 years old. I still have the plant, which has aged well, and is still growing! Since it is one of my favourite plants that has stayed with me through the years, I'll take an updated photo of it one of these days, and give it a separate post.
Wednesday, January 5, 2011
Nelumbo nucifera

I've been trying to get a lotus for my pond from a year ago, and finally got one 6 months ago. I had specifically wanted a single petalled lotus for its simple beauty, and finally found a pink one at AMK. However, growing it had its ups and downs.
When I got it, it was a small plant in a small pot. I had re-potted it in a nice big pot, and it grew well. New leaves, new flowers..... after it's second flowering, it started to get an infestation of aphids. I was diligent in swiping them off the plant (they dropped into the pond and were promptly gulped up by my goldfish) and this went on for a couple of months after which they plant got weaker and weaker, with smaller leaves, no flowers and finally even the new leaves had brown "varicose veins". I had tried popping a couple of the common fertilizer pellets for water plants but it did not help. The only visible result I had was green algae forming on the stalks of the lotus leaf that was below water level.
In a fit of desperation, I decided to severely prune down the leaves, remove most of the mud/soil in the pot, and put in new clay/mud. So far, it has decided to reward my efforts with new leaf growth (without the varicose veins), but it has all been leaves that float on the water. I will wait and see if it gets strong enough to put up the standing leaves above water, and eventually flower for me again.
Fingers crossed.....
Sunday, January 2, 2011
Thalia geniculata
I just repotted and split one of my favourite water plants, the Thalia Geniculata (or in my vernacular, the "Zig-Zag Flower Plant"). I have had this plant for just coming on to a decade. It has undergone so many re-potting and splits that I have lost track of how many friends and family were beneficiaries of it's growth. I bought it for my old rooftop pond, and now it sits in my garden pond. Although it is classified as a bog plant, it is possible to grow it in a container, as long as it is given enough water.
T. Geniculata is an evergreen, marginal aquatic perennial. I love it's easy maintenance nature, and both it's lovely lance-shaped green leaves and it's small purple flowers that keeps branching out in a "zig-zag" manner. When you have a really mature "zig-zag" flower on top of a long stalk, they look extremely elegant. To keep it tidy, regularly cut off browning leaves and flowers. The photo above does not do it justice, so I will post another after it has recovered from the split and repotting, and is flowering.
A good base of muddy/clayey soil with a fertilizer top-up every 2-3 months makes it a happy plant. Any balanced pelleted slow-release fertilizer is fine. Wrap up in cotton wool or newspaper, and shove it deep into the pot. A full re-potting effort is required once a year, to get rid of dead stems, and when it becomes pot-bound. If you are lazy, it can go on for up to 2 years in the same pot, but it will be a really hard job to re-pot cause the pot will be packed tight. Just split existing plants into different pots, to give it room to grow for the next year.
Subscribe to:
Posts (Atom)